 Save
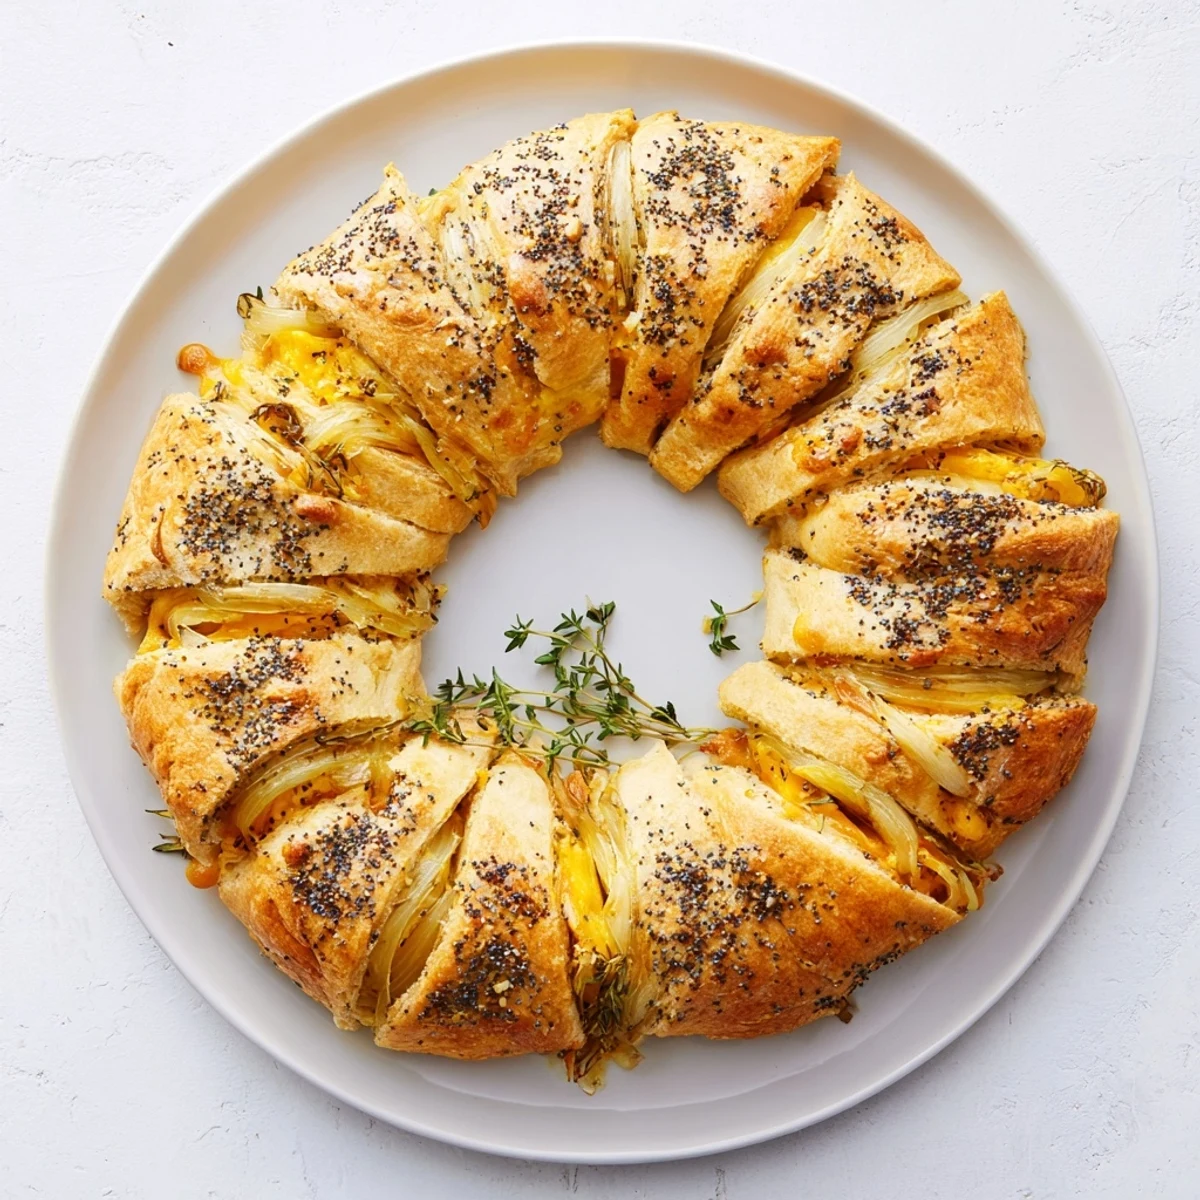
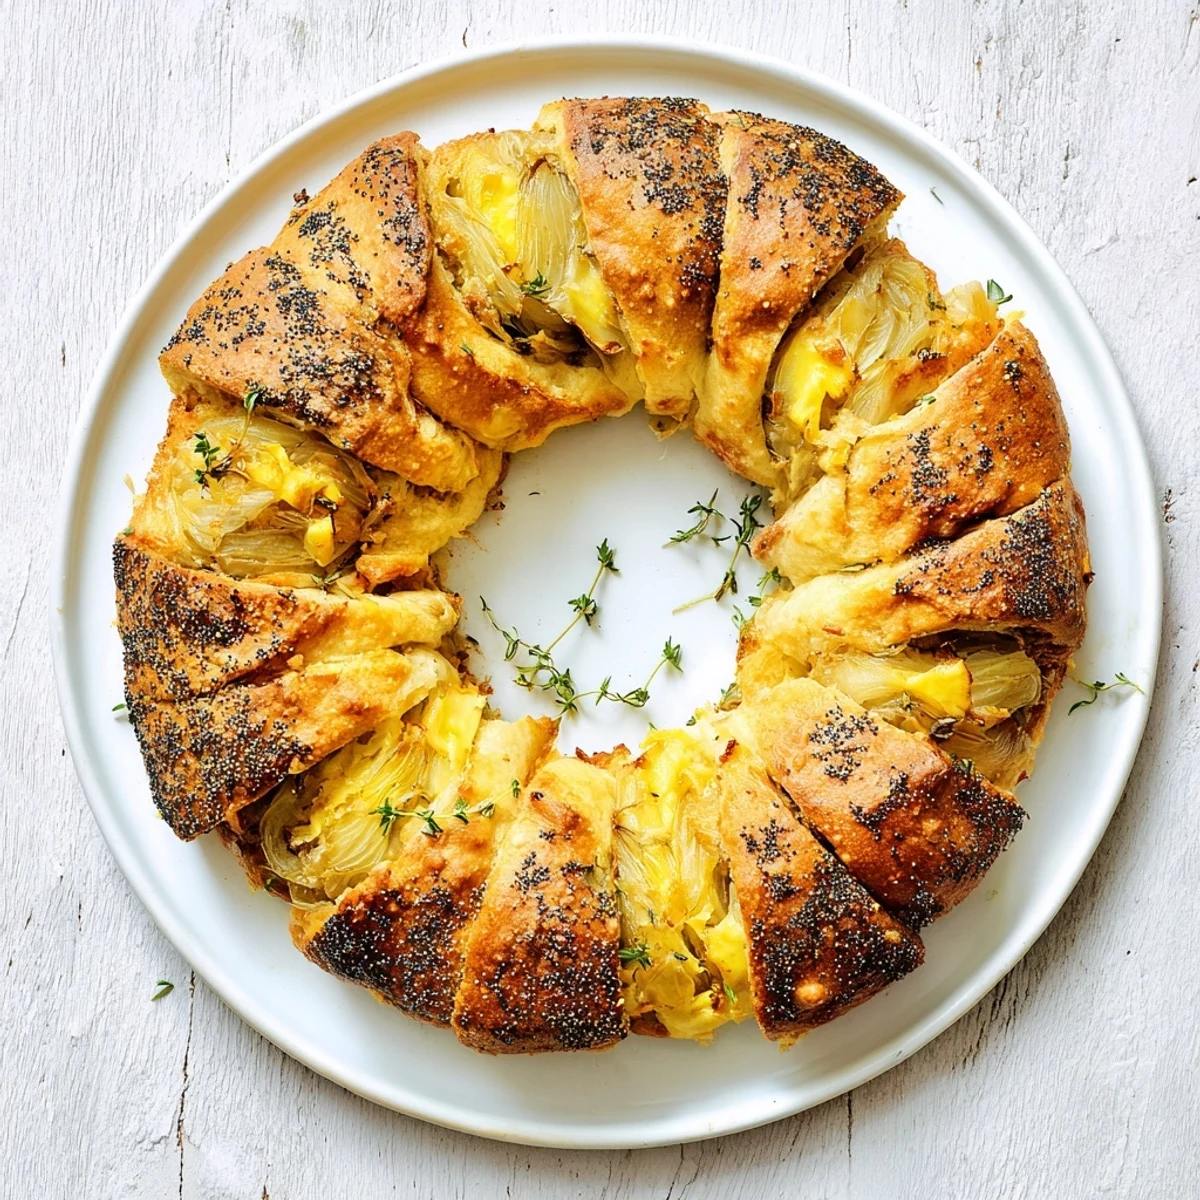
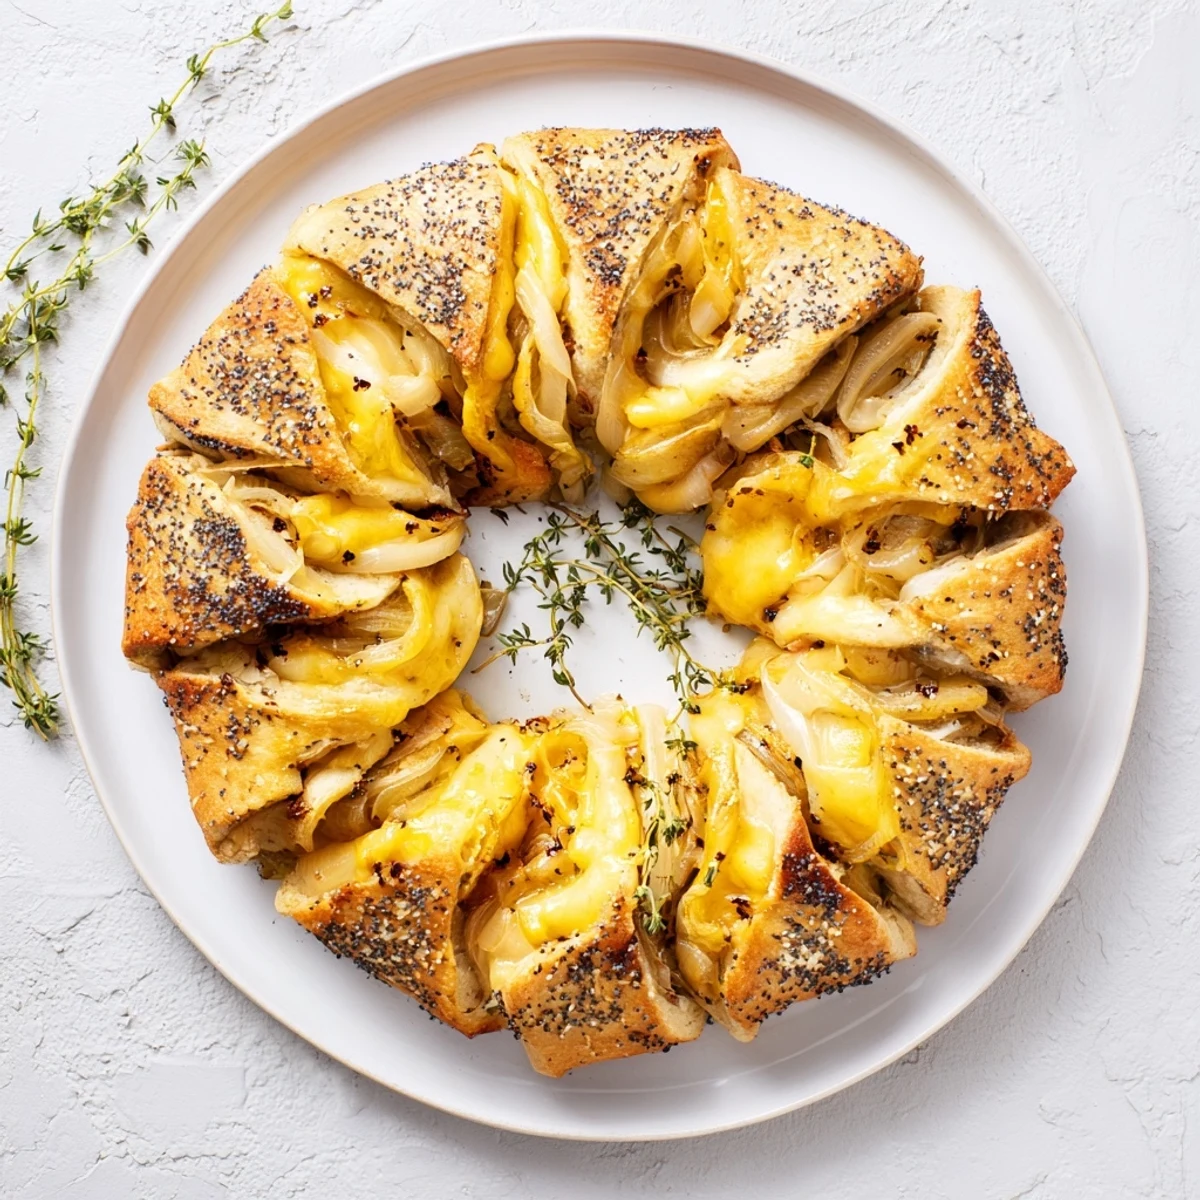
Save This impressive European-style bread wreath combines homemade yeast dough with a rich filling of slowly caramelized onions, aromatic fresh thyme, and premium Gruyere cheese. The dough requires two rising periods totaling about 90 minutes, while the onions achieve deep golden color and sweetness through 25–30 minutes of gentle cooking. Shaped into a festive ring and brushed with egg for golden color, the finished wreath yields eight generous servings. The finished creation features alternating segments of tender, golden-brown bread revealing the savory onion-cheese filling beneath. Ideal for holiday tables, celebratory brunches, or whenever you want to serve something truly memorable.
The first time I made this wreath, my kitchen smelled like a French bistro for three days straight. My roommate kept wandering in, asking if I was secretly learning to be a professional baker. When it came out of the oven, golden and glorious, we stood around the counter picking at pieces with our fingers, burning our tongues because we could not wait even five minutes.
Last Christmas, I made three of these wreaths for different gatherings. My aunt called me the next day demanding the recipe, saying her husband kept talking about it. Now it is my requested contribution for every family celebration. Something about tearing off pieces of warm, cheesy bread makes people gather around and stay awhile.
Ingredients
- All purpose flour: This creates the structure for your dough while keeping it tender enough to tear apart easily
- Active dry yeast: Fresh yeast makes all the difference, so check the expiration date before you begin
- Warm milk: The temperature should feel like a warm bath, around 110 degrees, to activate the yeast without killing it
- Granulated sugar: This feeds the yeast and helps the dough develop that beautiful golden color as it bakes
- Salt: Essential for flavor and for controlling the yeast activity so your dough does not overproof
- Unsalted butter: Melted butter adds richness to the dough and helps create a tender crumb structure
- Large egg: This adds structure to the dough and helps the filling bind together inside the wreath
- Yellow onions: Thin slices caramelize into sweet, jammy layers that contrast perfectly with the salty cheese
- Olive oil: Combined with butter, this prevents the onions from burning while they cook down slowly
- Fresh thyme: The earthy, slightly floral flavor bridges the gap between sweet onions and rich cheese
- Balsamic vinegar: Just a teaspoon adds brightness and depth that makes the onions taste complex and rich
- Gruyere cheese: This Swiss cheese melts beautifully with a nutty flavor that pairs perfectly with caramelized onions
- Parmesan cheese: Adds a salty, savory punch that intensifies the overall cheese flavor throughout the wreath
- Egg wash: Creates that glossy, golden finish that makes this bread wreath look professionally made
- Poppy seeds: These add a subtle crunch and visual appeal, though the wreath is beautiful without them
Instructions
- Wake up the yeast:
- Combine the warm milk and sugar in your large bowl, then sprinkle the yeast on top. Let it sit for about 5 minutes until you see a layer of foam forming on the surface, which tells you the yeast is alive and ready to work.
- Mix the dough:
- Add the flour, salt, melted butter, and egg to the yeast mixture. Stir until a shaggy dough forms, then turn it out onto a floured surface and knead for 8 to 10 minutes until the dough feels smooth and elastic, bouncing back when you press it.
- Let it rise:
- Place the dough in a greased bowl, turning it once to coat all sides. Cover with a clean towel and set it in a warm, draft-free spot for about an hour until it has doubled in size.
- Caramelize the onions:
- While the dough rises, melt the butter with olive oil in your large skillet over medium-low heat. Add the sliced onions with salt and pepper, stirring occasionally for 25 to 30 minutes until they turn deep golden brown and smell incredibly sweet.
- Add the finishing touches:
- Stir in the fresh thyme and balsamic vinegar, cooking for just 2 more minutes to let the vinegar cook off slightly. Remove from heat and let the onions cool completely before mixing with the grated cheeses.
- Roll out the dough:
- Punch down the risen dough gently and turn it onto a lightly floured surface. Roll it into a rectangle about 12 by 18 inches, taking care to keep the thickness even throughout so it bakes uniformly.
- Spread the filling:
- Evenly distribute the onion and cheese mixture over the dough, leaving about an inch border around all edges. This border will help seal everything inside when you roll it up.
- Form the log:
- Starting from one of the longer sides, roll the dough tightly into a log, pinching the seam firmly to seal it. Transfer the log to your parchment-lined baking sheet and bring the ends together to form a ring, pinching them tightly to seal.
- Cut and twist:
- Use kitchen scissors to cut slices two-thirds of the way through the dough at 2-inch intervals around the ring. Gently turn each section outward slightly, exposing some of the filling and creating that beautiful wreath appearance.
- Second rise:
- Cover the wreath loosely with plastic wrap and let it rest for 30 to 40 minutes. The dough should puff up noticeably and look pillowy when you gently press it.
- Preheat and brush:
- Preheat your oven to 350 degrees while the wreath rises. Brush the entire surface with the beaten egg wash, getting into all the crevices, and sprinkle with poppy seeds if you are using them.
- Bake to golden:
- Bake for 30 to 35 minutes until the wreath is deep golden brown and the cheese is bubbling in the openings. The internal temperature should reach about 190 degrees when fully cooked through.
- Finish and serve:
- Let the wreath cool on the baking sheet for at least 15 minutes before transferring to a serving board. Tuck fresh thyme sprigs into the openings and serve warm or at room temperature.
 Save
Save My niece helped me make this last Thanksgiving, carefully brushing each section with egg wash while I handled the cutting. She was so proud pointing out her wreath to everyone as they arrived. Seeing her face light up when people started tearing off pieces made all the effort feel absolutely worth it.
Making It Your Own
I have discovered that swapping in different cheeses creates entirely different experiences. Sharp Cheddar makes it more boldly flavored, while adding mozzarella creates these incredible cheese pulls when you pull apart a slice. Sometimes I mix in sautéed mushrooms with the onions for an earthier version that feels even more substantial.
Timing Your Recipe
The most forgiving aspect of this recipe is that you can caramelize the onions up to two days ahead and store them in the refrigerator. This means the actual day-of work becomes much more manageable. I often start my onions in the morning and let them cook slowly while I do other kitchen prep.
Serving Suggestions
This wreath shines as the centerpiece of a brunch spread or alongside a simple soup for dinner. The key is serving it warm so the cheese stays slightly melted and irresistible. I place small knives around the platter so guests can easily cut through the thick sections without tearing the whole wreath apart.
- Consider making mini individual wreaths if you are hosting a cocktail party
- The wreath travels surprisingly well if you need to bring it to a gathering
- Leftovers reheat beautifully in a 350-degree oven for about 10 minutes
 Save
Save There is something deeply satisfying about pulling apart warm bread with friends and family. This wreath has become my go-to for creating those moments around the table where good food brings people together naturally.
Common Questions
- → Can I prepare the onion filling ahead of time?
-
Absolutely. Caramelize the onions up to 2 days in advance and store them in an airtight container in the refrigerator. Bring to room temperature before mixing with cheese and assembling the wreath.
- → What cheese substitutes work well if I cannot find Gruyere?
-
Swiss cheese, Emmental, or aged sharp Cheddar provide excellent melting properties and flavor complexity. Fontina or Comté also work beautifully for that creamy, nutty profile.
- → How do I know when the onions are properly caramelized?
-
Properly caramelized onions turn a deep golden-brown color and become noticeably sweet. They should be soft and slightly sticky, not burnt or dry. The process takes patience—aim for that rich mahogany hue.
- → Can I freeze the assembled wreath before baking?
-
Yes. After shaping and cutting the slits, wrap the wreath tightly in plastic and freeze for up to 3 weeks. Thaw overnight in the refrigerator, complete the final rise, then bake as directed.
- → Why did my dough not double during rising?
-
This often happens if the milk was too hot and killed the yeast, or if the rising area was too cool. Ideal yeast activation temperature is 110°F. Find a warm, draft-free spot—sometimes a slightly warmed oven with the light on works perfectly.
- → Can I add other ingredients to the filling?
-
Certainly. Sautéed mushrooms, crumbled bacon, or chopped walnuts make delicious additions. Just keep the total filling amount moderate to prevent overflow during baking.